
You must have always seen an icon that is presented before the URL or the title of your site. These small icons are known as favicons and are visible to both the desktop and the mobile users. So, if you have a business you need to compulsorily have a good favicon. Thankfully, adding and editing a favicon in WordPress is a simple task. In this blog, we will provide you with a complete process of adding a Favicon in WordPress through which you can make a memorable impression on your visitors.
Table of Contents
3 Methods to Add Favicon in Your WordPress Website
With the improvement in the WordPress version adding a favicon to a WordPress website has become much easier than earlier years. Below are the 3 important methods that can help you to add a favicon to your website.
Method 1: Adding a WordPress using a WordPress Customizer
Here is a step-by-step WordPress customizer process to add a favicon to your website.
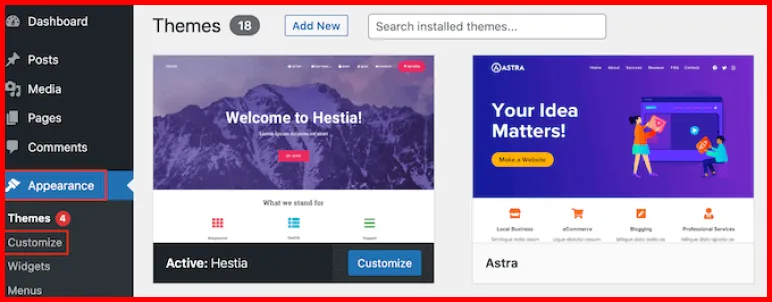
- Firstly, login into your wordPress dasboard.
- Then click on the appearance visible on the left side of the dashboard and then go to customize to open the wordPress customizer.
- In the customizer section, search for a site identity section and click on it.
- In site identity, you must click on the site icon option. This is the section where you need to upload your favicon file.
- Now, select your desired or favorite image to upload by clicking on the select file button.
- Instead of selecting an image from your device, you can even select an already uploaded icon image from the WordPress media library. The recommended size of a favicon must be 5112*512 pixels. WordPress even allows you to crop images as per your needs.
- Once your favicon is cropped and is in perfect size, click on the Publish button at the top of the customizer to save changes.
Method 2: Steps to Add Site Icons With a WordPress Favicon Plugin
WordPress favicon plugin is another method to add a favicon to your WordPress Site. Here you will learn about how to add a favicon with a plugin like RealFaviconGenerator.
- First, go to the plugins on your site dashboard and click then click on add new plugin option.
- Secondly, you need to install your desired plugin and activate it.
- Navigate to Appearance > Favicon.
- Then, click on the ‘Select From Media Library’ button.
- Now you can add your icon image file and then click select.
- Now you have to click on the ‘Generate Favicon’ button.
- This complete process will take you to the RealFaviconGenerator Website. This is the best tool to help you choose WordPress icon size and fonts. It also represents a preview of how it will look on the Google Search Results page, mobile browsers, desktop web browsers like Safari or Chrome browser.
- Now you have to scroll to the Favicon Generator Options and then you need to specify if this is the first time you are using any favicon generator plugin or want to replace it with an existing one.
- Now click the ‘Generate your Favicons and HTML Code’ button.
- The plugin will generate and install the Favicon files on your site, showing a “Favicon is installed!” message on your dashboard. After a favicon installation process is completed
Method 3: Steps to Manually Adding a WordPress to Your Favicon Website
- First, you need to create your site ion and then gather every favicon file in a zip package.
- Now you need to upload the zip package content on your site’s root directory. You can either use a FTP client or your web hosting control panel’s File Manager. Public_html is usually a root directory. In this folder you can even get WordPress files named wp-admin and wo-content.
- The favicon code needs to be added to WordPress next in order for browsers to recognize it. Use File Manager or FTP to make changes to the header.php file in your theme files.
- Now you need to enter some type of code within the <head> section of your header.php file.
- Now after adding a code you can save changes into the header.php file.